Hello wonderful Crafty Scrappy Happy friends!
I hope you had an AMAZING holiday.
I hope you ate wonderful food.
And gave thanks for all you have.
I am sorry that I was away----
but I am not sorry for the time I spent with my family and the memories I made.
BUT now, bring on the Christmas Decor!!!!
I LOVE the shabby chic look right now-
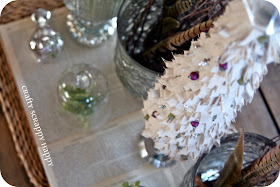
Sooo I was inspired to make this shabby chic ruffled Christmas tree.
Sweet and simple---let me show you how to make your own!
-Fabric
-hot glue gun
-iron
-scissors
-candle holder and "tree topper"
-beads and pins {for the ornaments}
1. cut fabric into strips
2. fold and iron fabric in half
3. cut folded strips
{And don't worry NONE of these steps have to be perfect---
let me tell you what I always say---my crafts are NEVER perfect...
but I like them even more because they aren't!}
4. Next find a candle stand and a tree "topper" {I found mine at Michaels}
5. Start wrapping and gluing the fabric so that each layer overlaps to the STYROFOAM™ Brand Foam with hot glue.
6. add ornaments {I used beads from my DIY jewelry stash}
use a pin to attach them but pushing them right into the tree.
ruffled and fun right?
I like the messy fabric look.
especially amongst the mercury glass decor!
Andddd because as you know, I am ALWAYS changing my decor around---I HAD to try another spot for my tree....
I hope you have an amazing start to your week and I look forward to showing you my holiday decor in the next few weeks!!!
Ohhh and before I forget again----
Winner winner chicken dinner
I COMPLETELY spaced and didn't announce that the winner of the super sweet bag
made especially for YOU by Eva from Delightful Creations
is:
Comment #12
Contact me so we can get this super sweet bag sent your way!!!


Thanks for the tutorial I always thought you had to cut and fold each of those square fabrics to make those kind of trees! Now I see it is much simplier. I love your style and the tree looks splendid!
ReplyDeleteI love this! I have not seen anything like it before! You have the most creative ideas here! Great job friend!
ReplyDeleteSo cute! I might have to try it! Thanks for sharing.
ReplyDeleteI love that you placed yours atop a candlestick - that's a different and new way of doing this craft. Great thinking and pushing the envelope!
ReplyDeleteThis is really cute. Neat idea :)
ReplyDeleteLooks great!!!
ReplyDeleteAimee from ItsOverflowing.com
SOOOO perfectly shabby chic! Love! It looks gorgeous both ways you displayed it-you have such a beautiful knack for decorating!!!
ReplyDeleteI am LOVING it!! This is definitely going on my "Christmas TO DO" list. :)
ReplyDeleteJaime! This is beautiful! I love the way you displayed it...your decorations are so elegant and lovely...you are so awesome...
ReplyDeleteOh, I love this! I have been having so much fun with the styrofoam trees so far this year. I really like your idea of attaching a candle holder to the bottom to give it height. Super cute.
ReplyDeleteThis looks great! It fits perfectly atop my very favorite 25 drawer piece of furniture ever! Still adore this piece!!!
ReplyDeleteSuper cute, and I'm doing this with my kiddos this week! Thanks for the inspiration :)
ReplyDeleteummmmm, gorgeous! & jealous!
ReplyDeleteBeautiful, I tried this last year in paper but the burlap is definitely much prettier.
ReplyDelete:) Lori m
It is beautiful! That candlestick really makes it, the combination of raggy and elegant are just perfectly shabby chic.
ReplyDeleteI love this cute little tree! I can't wait to try my own hand at making one. Thanks for the tutorial.
ReplyDeleteI love it, Jamie Lyn! Your eyelashing tutorial is great. I love the little jewelery you added to it too. Thanks for sharing!
ReplyDeletexo
Jami