Here is what I worked on tonight!

But first on a personal note:
Hi Guys, I have had SUCH a great weekend---#1 reason---my little baby sister is engaged!!! I am beyond happy and that is partly because she is so darn happy and partly because I know I get to have her soon to be husband around forever---he is just great (I feel like that doesn't always happen--extra bonus!)
My weekend was also amazing because the temperature in small town Michigan was 85 degrees today---I love warm weather and I LOVE the little lake in my back yard! And to top things off not only did I get to play in the sun, paddle boat, eat ice cream, have a campfire and take a walk, but I got to do it with my favorite friend Tessa!
Finally my weekend was GREAT because I discovered a new technique that I am beyond excited about! I am in love with graphic fairy images and quotes and am always looking for ways to transfer them onto my projects...I was beyond the moon when I discovered the citra solv technique to transfer images onto fabric (click here if you missed it), I was super excited to learn how to transfer onto candles last week and now this week I have stumbled upon possibly to most amazing and ironically the easiest technique. Transfering images onto wood---- {insert huge smile on my face here}
Here are my inspirations:
Do you have a store that makes you SO SO SO crazy because you want everything in it?

Because I do, it is called Pottery Barn.
And of course as all favorite stores seem to go, everything in PB costs a million dollars, yet I still faithfully drool over their catalogue every time the arrive in my mail box---just picture every page dog tagged, this is when I begin scheming about how I can create my own versions at a fraction of a cost. (PB cost for the big canvas-$129.00) (My cost-nothing but time...I had everything I used)

Thanks to graphic fairy this new-to-pottery-barn vintage chair art work was do-able with my new technique so I thought it was a great fit for my project.

My crafty scrappy happy version:


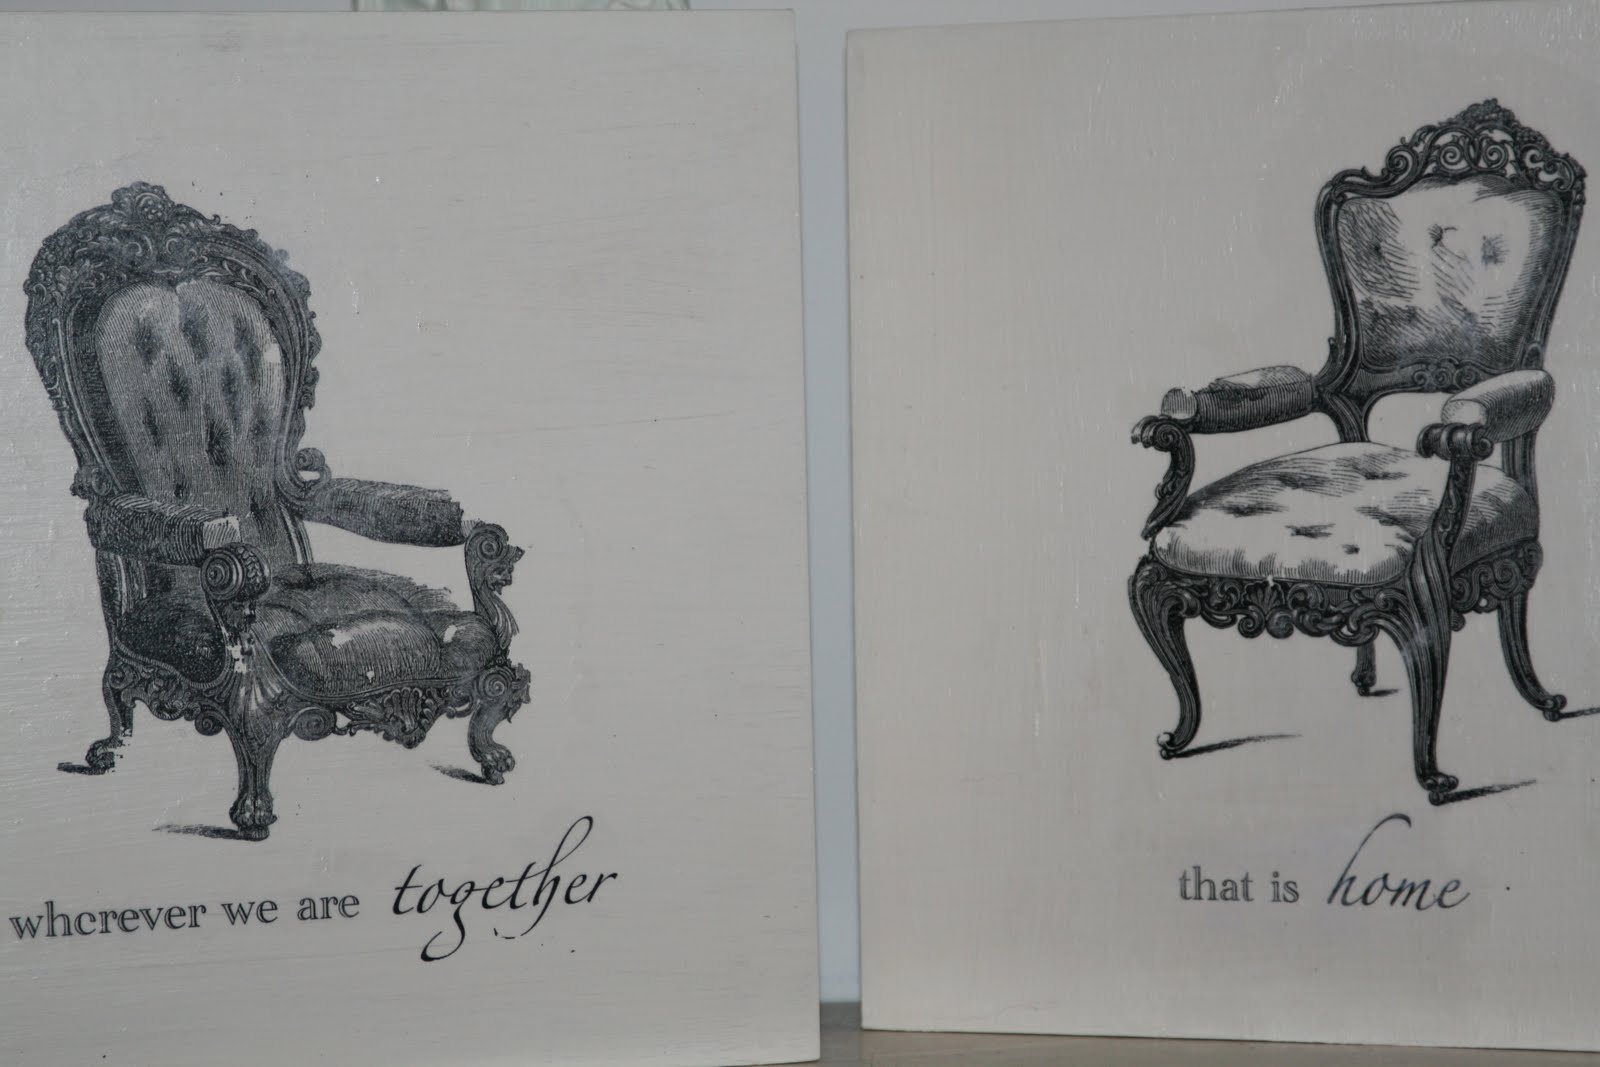
And just for fun I made this one since I had everything out (I am a multitaske-er what can I say?!?)
I have been wishing to find something with this quote/song on it---why not make it myself?!?


What you need:
a wood surface (painted or not painted work just fine-I tried both)
Mod podge
a paint brush
a graphic printed on plain paper (I used lazer jet ***I don't know how ink jet works because I haven't tried it but read my advice at the end for possible tips for ink jet printers)


Here is how I did it:
I painted my wood surfaces before I added my graphics (which works out great if you are recycling/up-cycling your wood material like I was)

Next pick and print your image ***If you are using anything with words you have to reverse (mirror image) your graphic or quote before you print it. (If you don't know how I can tell you how I do it--I assume it is the same idea for everyone but there might be different ways of getting there)

Next cover your surface with Mod Podge and place your paper image ink side down and work hard at getting rid of any bubbles that may form

Now for the hard part, waiting for the mod podge to dry-mine took about an hour but my guess is the longer you wait the better
Then bring your work to a sink/grab a spray bottle and get the paper wet and scrub away the paper-gently so your image stays. I did scrub too hard my first time so I just scrubbed off my image and started over.

Finally, this step is optional but I wanted a uniform mod podge look over my entire work surface so I just did a final thin layer over everything.
Advice:
So here is my disclaimer-my projects are never perfect and I am no pro, just a crafty gal who is always willing to try new things. I *believe* that if you have an ink jet printer and this technique won't work the way I just described it to you, you have another option. You can "paint" a layer of Elmers school glue onto a piece of paper (let it dry) and print your image on the glue and then do all of the other steps the same. Let me know if it works!!!
Cut the image paper around the image, you will save some scrub time.
Also don't scrub too hard on you image, softly rub....you might rub away your pretty work it you clean too well, I found it was better to go a second time and remove the last little paper bits after you let things dry the first time.
I did also try this technique on a shiny metal pail....and to my disappointment it didn't work...might have been because the surface was shiny (the mod podge rubbed right off) this doesn't mean I won't try again!
Now tell me what you think!!!
Is your brain turning? (mine still is) Do you have all kinds of ideas? (I have three million) I would love to hear about them! Any questions??? I would love to help. Would you like my sunshine printable?!?! Shoot me a comment about which you would like (regular or mirror image) and your e-mail-- and then I will send it right your way!
***I am linking up to a few parties this week because I love to inspire other crafters and DIY-ers---check out my page at the top of my blog to see where to go to be inspired!!!***
Thank you for stopping by!
my oh my I love this. PLEASE make me one! you are AMAZING.... amazing
ReplyDeleteI miss you
Thanks, what a great idea!!! Could you tell me how you reversed your image?
ReplyDeleteThank heavens for the graphics fairy!I've just stumbled on your blog - and love this make, I love the writing under the chairs. This is really clever - think I'll need to read through it a few more times before trying though!
ReplyDeleteYour project is amazing, love it! The graphic's fairy is awesome, I get all my images from there. I'm your newest follower and I love your blog. Keep up the good work.
ReplyDeleteXXX Ido
PuppyFly Boutique and Ido thank you both so so so much for visiting, commenting and becoming followers you guys really made my day!
ReplyDeleteLinda, here is how I reverse my images-
I first save my project when I am done with any changes as a word file (once you start converting the file it is hard/impossible to make changes as far as I can tell), then you convert/export the file to a pdf, from a pdf you are able to covert to a jpeg. When the graphic is a jpeg you can select from the tools drop down menu to flip horizontally. I hope that helps and of course thanks for stopping by and commenting too!!!
Thanks for stopping by and visiting me. Yes I made the plate myself with a rub on transfer I purchased at Michael's. I love what you did with your graphics. I love the Graphics fairy too. I'll be more than happy to mail you some because well I bought ALOT of them since they were on clearance for .10. Just email me.
ReplyDeleteI love it! I'm so glad that I have a friend that finds all this stuff and just tells me what to do. The quote worked out perfectly. I can't believe something so easy was out there all along.
ReplyDeleteRebekah
I love this, excellent tutorial, as always! Thank you so much for sharing it all with us :)
ReplyDeleteLove those chair images!
ReplyDeleteI too love PB and can't wait for my issue in the mail. My husband teases me that I've looked at each catalog 30-40 times. I just can't help myself - I love their stuff! I have seen these little chair pictures and have thought of doing them myself!
ReplyDeleteEmily
Love this project! You did a great job, well done!
ReplyDeleteYou are so talented! Come decorate my house!
ReplyDeletelove this!! you have quite the talent!
ReplyDeletekisses
heather
Hello Jaime, your blog is so incredibly simple and pretty! I love it.
ReplyDeleteI don't know how I ended up here, but I'm glad I did.
I am following your blog, I don't want to loose any of your creative posts.
xoxo
well I am going to try this! I love the images I used the exact same ones. funny!!!
ReplyDeleteI am your newest follower. thanks for sharing
Caroline
I might have missed this somewhere, but could this be done on a canvas?...these are fantastic!!!
ReplyDeleteLOVE this and I especially love the Sunshine phrase! That is what I call my daughter and I would love to make a sign for her room. A regular (right reading) image would be great!
ReplyDeleteThanks for all the great inspiration!
Hi Erin, I couldn't find your e-mail on your profile, if you let me know what it is I will send it right your way!
ReplyDeleteSteph, I am guessing that you can use this method on canvas I haven't personally tried it but it works well on any surface that isn't too smooth so canvas should work great-but let me know if you try it!
And new followers, you are the BEST!!!!
Thanks for all of the wonderfully encouraging words! You have all made my day wonderful!
Congrats on the knock off decor feature! You are awesome! Connie, Measuredbytheheart.blogspot.com
ReplyDeleteThis comment has been removed by the author.
ReplyDeleteI love this idea! I have seen so many cute sayings recently, now I can make my own! I would love a mirror image of 'sunshine'.Thanks, Cheryl
ReplyDeletecheryl_fields@hotmail.com
ReplyDeleteMy email, sorry :(
Yours is so very MUCH nicer than Pottery Barn's!!!
ReplyDeleteWow they are beautiful, I've just started following, can't wait to see more of your projects x
ReplyDeleteLove the "Sunshine" so cute! I would love to do a version of this for my son's nursery. My email is coamad18@yahoo.com. I would love the mirror image...
ReplyDeleteHey Jaime Lyn!
ReplyDeleteLove these! turned out awesome! I featured them today here: http://www.craftaholicsanonymous.net/2011/05/spring-craft-ideas-reader-features.html
happy crafting!
Linda
oh, what a great idea .. thank you so much, especially the tip for the ink jet printer-owner. I also heard you can do this with a photo-copy of your image and will do the same as the laser jet - but I have not try this yet. I would like to get the copy of your "Sunshine" b/c that is my favorite's son little song. Thanks again for sharing.
ReplyDelete-grace
projects159 at yahoo dot com
I would love a copy of the "Sunshine" lyrics in mirror image would be great but might I be greedy and have one of each?? BTW, I never said, but I found you through your mantle post on the CSI Project. Thanks again for another wonderful idea!! Take care, VBg
ReplyDeleteNew fan here! Hello and thanks for your instructions. I'm just learning about these transfer projects. Please send me the Sunshine lyrics in both mirror-image and normal - thanks in advance! My email address is: homeagain0522@yahoo.com. MT
ReplyDeleteWhat a creative girl you are! I'm so glad I found your blog and I've bookmarked it and pinned you too! Thanks for sharing your fun ideas.
ReplyDeleteI LOVE the Sunshine lyrics. Please send me the mirror image: melanie520@comcast.net. Thanks so much! Can't wait to try this!
ReplyDeleteI just found your blog this morning searching for some new ideas, and I love all your creativity! Your sunshine sign really caught my eye, because it is my 2 year old daughters favorite song. I'm in the middle of decorating her "big girl" room, and I'd love if you could e-mail me the reverse of the song. I can't wait to try this and put this up in her room! ktfish@gmail.com Thanks, Kate
ReplyDeleteGreat tutorial. I made a sign using it and I love how it turned out... thanks! I posted about it and put a link to you in my post.
ReplyDeletehttp://simplychictreasures.blogspot.com/2011/08/vintage-looking-sign.html
Thanks for sharing; I'll be trying this fun technique today!!!
ReplyDeleteThanks for a Great tutorial! My daughter is in college and I would love to try and make a sign for her. I have sang this to her all her life! Please send me the sunshine printable in mirror image. I'm going to give it a try! Thank you so very much! Tay my email is, tay13@charter.net
ReplyDeleteI just found this the long way around thru Graphics Fairy. Gotta love her! Love your projects too! I know it's been a while since you posted this but do you think I could also get the normal Sunshine printable? We had a stuffed clown that played it. It was my sons favorite toy. Would love to make a sign for my granddaughter. My e-mail is tokatydid@gmail.com. Thanks!
ReplyDeleteIs it too late to get a mirror image copy of the sunshine quote? I really like what you did above and would like ti try it myself. My email is maggs2006-creates@yahoo.com.
ReplyDeleteI just found your post. This is great news! I can't wait to try this ASAP. Thanks so much for sharing. Great tutorial I might add :)
ReplyDeleteI absolutely love this. Is there any way to get the mirrored image of the Sunshine saying still? We sing this to my niece all the time and would love to be able to make this to hang in her room at my house. My email is RobinP5380@gmail.com. Thank you so so much.
ReplyDeleteI love your font on your sunshine! Could you please send me either the regular or the mirror image would be even better?
ReplyDeleteThemistirains@gmail.com
What an inspiration. I have tried and failed more often than remembering. I love your tutorial on transfer of images. Needless to say I could not find CitraSolv in our town. Have to follow your advice and order on line. Thanks for sharing.
ReplyDeleteGreetings from South Africa.
thanks for sharing, I LOVE this! can you please send me the sunshine print, both regular and mirror? jmariahgill@gmail.com Thank you!
ReplyDeleteLOVE this, sunshine caught my eye, didn't ever realize how cool this is until I read the rest of the post. Can you also send me the Sunshine file you've created. THanks!
ReplyDeleteCandace01854@yahoo.com
Hi just saw your awesome Transfers. I just purchased a new ink jet printer, now I totally regret not getting a lazer printer. I love the Transfers, could you send me the You are my sunshine one please. Im gonna try the transfer with the elmers glue. I can totally mirror the image with my printer software but I think I would like to have your mirror image, it might be easier. I'll let ya know how it turns out. Thanks. Kellycrawford1967@yahoo.com
ReplyDeleteCould I possibly get the regular and the mirrored image copies of the Sunshine sheet? Our daughter is going out of the country for a year and I would love to send her with something that makes her think of Mom & Dad. We sang that song to her when she was a baby (she'll be 23 in January). Thanks so much! janaclift@gmail.com
ReplyDeleteI've just found your tutorial and LOVE it!! I too would love to have "You are my Sunshine" mirror imaged if you dont mind. Thank you so much! You are very talented!! My email is pebblesbedrocks@hotmail.com
ReplyDeleteI hate to be another person to ask but... Can you email me the sunshine song in reverse? I'm going to try to print it and then photocopy it. If you have time, thanks. Vo@thisisheathersemail.com
ReplyDeleteI'm having a hard time getting the pictures to transfer. I watched countless videos and read plenty of tutorials before attempting my first transfer. I believe I'm using inkjet images (I printed them off at work) so I tried the gel medium method - Paint gel on the block, apply pic, let dry overnight, wet and rub paper off. The problem I'm having is getting the paper to come off without taking the pic with it. Some of the paper 'rolls' off as described but mostly it just takes the pic off, too - and I wipe/rub really gently, as this is my 4th attempt - or the pic doesn't stick completely to the wood in the first place! Am I not using enough gel medium? What am I doing wrong?
ReplyDeletePure Genius !!
ReplyDeleteOh my! Yes my 34 year old, always been the Sunshine of my life Birthday Girl Daughter needs this...I Would love your "You are MY Sunshine" printable?!?!ASP If I could get in Mirror image please please please..
ReplyDeletelavohne@yahoo.com
ps I can't wait to follow your blog..TY
This is such a great blog. I'm going to start following as soon as I'm finished writing this. This project reminds me of my grandma who passed away last year at the age 96. "You are my sunshine" was her favorite song and it was played at her funeral. I'd love to get the mirror image sent to me if you are still emailing them to bev.holte@hotmail.com. Thank you SO much!!
ReplyDeleteJust ran across your blog, love it so many ideas. If still possible I would love to have a copy (mirrored image) of You Are My Sunshine.
ReplyDeleteI am from a small, lakeside town, in Michigan.
Thanks
Linda
jimlin67@charternet
LOVE LOVE LOVE this idea! And your 'Your Are My Sunshine' one is darling. I would love to get a copy as well if at all possible it would go great in our nursery.
ReplyDeletecmwslah@yahoo
Love Love Love this! Just found your blog and I am now following you and added you to my Pintarest o I am sure others will be following you as well. I would love a copy of the You are my Sunshine quote - reversed. I am doing a DIY project for my mothers birthday and this is the perfect quote. Thanks and keep crafting - I have found atleast 5 must do projects on your site in less than an hour. My brain is going a million miles an hour. Can you tell me if the mod pdge transfer technigue works on canvas or burlap? tanielyork@gmail.com
ReplyDelete